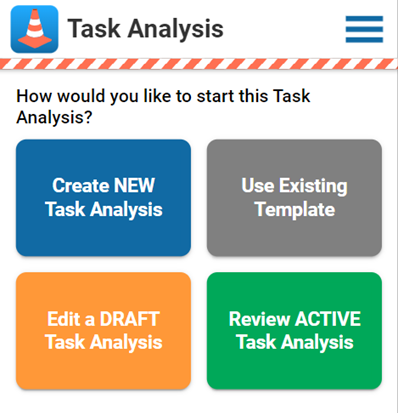
Creating a new Task Analysis
To start a new task analysis, go to the Task Analysis start screen and tap ‘Create NEW Task Analysis’ (to start from a minimal ‘default’ template), or ‘Use Existing Template’ (to use a previously created template). The new task analysis will open as a ‘draft’ for editing - at any time you can use the ‘save draft’ button to save your progress if you wish to exit and return to complete it later. Drafts you’ve previously saved can be found by tapping the ‘Edit a DRAFT Task Analysis’ button.
1. Enter general details
Start by filling in some details for your task:
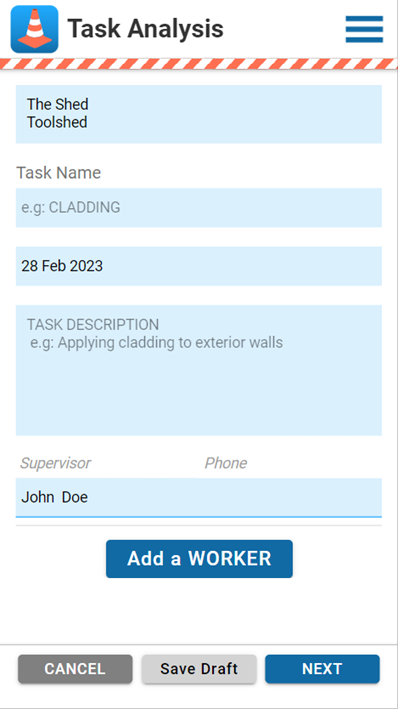
- Project - Select from list. If there is only one project for the site you are signed in to, this will be selected by default.
- Task Name
- Date - Select the date that work will be carried out
- Task Description
- Supervisor - select the name of the person who will be supervising the work being carried out
- Add workers - select any other people who will be taking part in the job.. Workers can be deleted by swiping left on a worker and tapping the red delete button.
Tap “NEXT”:
2. Task steps
On this page, list the steps involved in your task. The number of steps will depend on the specific task, but should not need to be more than about 6. Try to choose steps that match different types of hazard being present - for example framing a wall might be three steps:
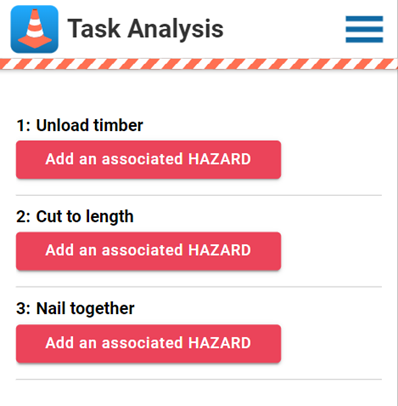
Step 1: Unload timber (manual handling hazards)
Step 2: Cut to length (hazards associated with drop saw)
Step 3: Nail together (hazards associated with nail gun)
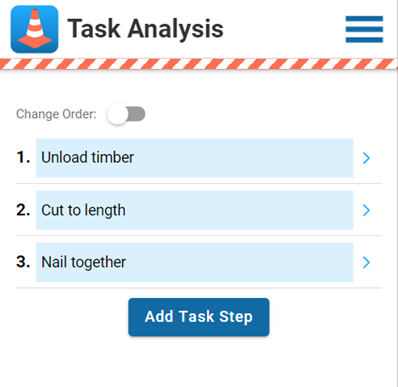
- Task steps can be added by the “Add Task Step” button (adds a new step to the end) or by tapping a chevron and then the “INSERT STEP” button (adds a new step before the selected step):

- Tap the blue textbox area to enter or edit step details.
- To delete a step, tap the chevron to the right of the step and then the “DELETE STEP” button.
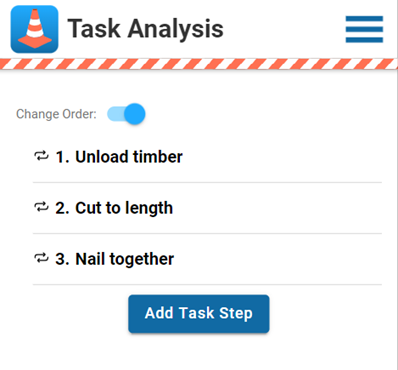
- Rearrange steps by tapping the “Change order” toggle at the top of the page. In reorder mode, tap and hold a step to drag it to the desired position in the list. To edit and delete steps, tap the toggle again to disable reorder mode.
When you’re happy with your list of steps, tap “NEXT”.
3. Adding / reviewing hazards and controls
The next page shows your step list with a coloured button for each step:
- A red button indicates that the step has not had any hazards selected yet
- A green button indicates that hazards and controls have been added to the step
- An orange button means that the step has hazards and controls, but you should review them to make sure they are appropriate (this may be the case for some steps if you’ve started the task analysis from a template)
You can tap the button for any step to view or change it’s hazards and controls. Or, you can just tap “NEXT” to go to the next step that needs your attention!
Either way, you’ll see the following:
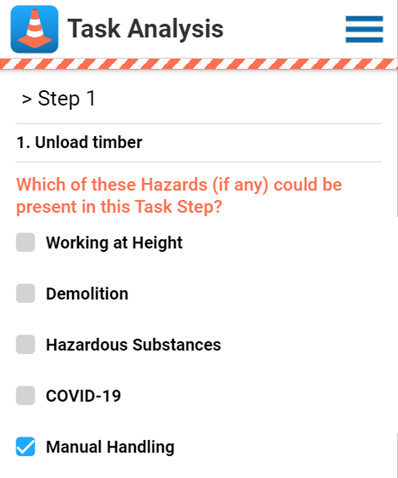
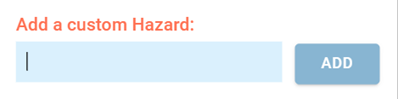
This page shows a list of general ‘categories’ of hazard. Select all that apply by tapping the associated grey blank checkboxes. If your step involves an unusual hazard that isn’t in the list, you can type it in the ‘custom hazard’ box and tap the “ADD” button.
If a category is ticked and greyed out, this means it already has controls assigned to it.
When you’ve selected all the hazard categories that apply, tap “NEXT”. You’ll see something like this:
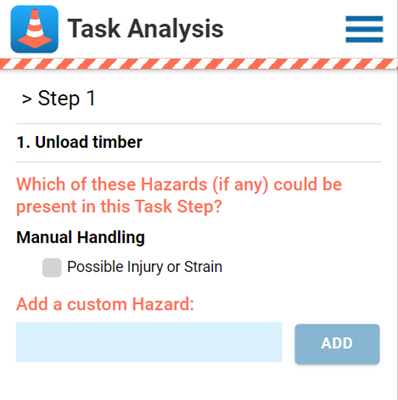
This page shows a list of specific hazards within each of the categories selected on the previous page. Select all that apply by tapping the associated grey blank checkboxes. You can also add custom hazards (it makes no difference whether you add a custom hazard from this page or the previous one).
If a hazard has a green tick box, this shows that it has already had controls assigned to it:

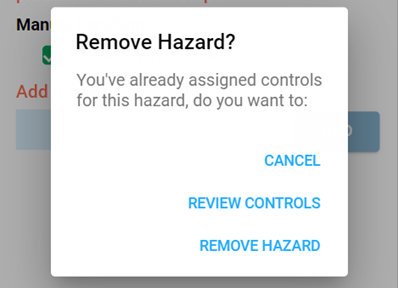
If you tap a green tick, you can choose to either review the controls that are in place or remove them:
The first checked hazard that hasn’t had controls assigned to it yet will have an arrow next to it:
When you’ve selected all the hazards that apply, tap “NEXT” to determine a ‘risk score’ for the hazard shown:
Think about the hazard that’s shown and ask yourself ‘what is the worst thing that could happen?’ (in this case the answer might be ‘a serious back injury’). Then:
- Move the top slider to reflect how serious it might be (as you move it you’ll see text showing what the 5 possible values mean - pick the one that fits best)
- Move the bottom slider to reflect how likely the ‘worst thing’ is to occur
The combination of these two things will give you an ‘initial risk score’, which is a measure of how serious or dangerous the hazard is with no control measures in place. If this score is greater than 6, then the hazard requires controls, i.e. measures to make it safe.
Tap “NEXT”:
This page shows a list of typical ‘controls’ that might be used to mitigate the hazard. Select each control you plan to put in place by tapping the grey blank checkbox. If you plan to use a control that’s not in the list you can add it by typing it in the ‘custom control’ box and tapping the“ADD” button. (you’ll need to do this to add controls for a ‘custom hazard’). Custom controls can be removed by tapping the chevron or swiping left on the control then tapping “DELETE”.
Once you’re happy with your control selection tap “NEXT”.
Consider the same question as before, i.e. ‘what is the worst thing that could happen as a result of this hazard’, but this time with the control measures you’ve just selected in place. Set the ‘How Serious’ and ‘How Likely’ sliders to what you think they should now be (i.e. your controls should mean that the ‘worst thing possible’ is now either less serious or less likely, or both). This will give you a ‘residual risk score’:
- If the score is now 6 or less (shown in green), then your control measures are adequate
- Otherwise, select different controls and score again
Once you’ve confirmed your controls are adequate, tap “NEXT”.
The process of determining risk scores and selecting controls will be repeated for each hazard in the step. Once all hazards in a step have controls applied, you’ll be taken to the next step. As you complete each hazard, just tap “NEXT”, and eventually…all the steps in your task will be green!
4. Select PPE
Tap the PPE items required for the job. Selected items will change to an orange icon with bold text. If the required PPE is not present it can be added using the “Add a PPE item” field and “Add” button. Custom PPE items can be removed using the chevron to the right of each item. When all required PPE has been selected tap “NEXT”.
5. Review Task Analysis
This page shows the completed task analysis. Review the information to ensure details are correct.

The ‘Actions’ button will display a list of things you can now do with the completed Task Analysis:

6. Using a Task Analysis
Tapping ‘Use this TA’ will save the completed task analysis, change it from ‘draft’ to ‘active’, and email it to everyone selected as a supervisor or worker.
Once ‘Use this TA’ has been confirmed the available actions will change:

Workers can now ‘sign on’ to the task analysis to acknowledge that they have read it and know what PPE and controls they need to put in place to complete the job safely. To sign on a worker:
- Tap ‘Add Signature’ in the actions menu. The list of workers will be displayed - tap the person who is signing on:
- Pass the phone to the worker, who can add their signature in the space provided

Once at least one person has signed on the task analysis will be locked. If any changes need to be made this will create a new revision of the task analysis, and any existing worker sign-ons will be discarded.
Comments
0 comments
Article is closed for comments.